Reports provides a way to evaluate your team performance. It lets you to get an overview of all your activities. Joforce CRM offers you with two different types of reports,
- Detailed Report
- Chart Report
You can classify your records under different groups. Click on the Reports icon in the Quick Actions Bar.
Creating new folders #
Folders provides a better way to classify or group your reports. To Create a new folder,
- Click on the List text box → + icon beside the FOLDER menu on the left side.
- Add the Folder name and description
- Once done, click on Save.
Move records from one folder to another #
To move the reports,
- Choose the desired report
- Click on the drop down in the top → Move Reports
- Now choose the appropriate folder to which you need to move the report
- Click on Save.
Detailed report #
To create a new report, Click on the Add Report and choose Detail Report from the drop-down. Add the following details,
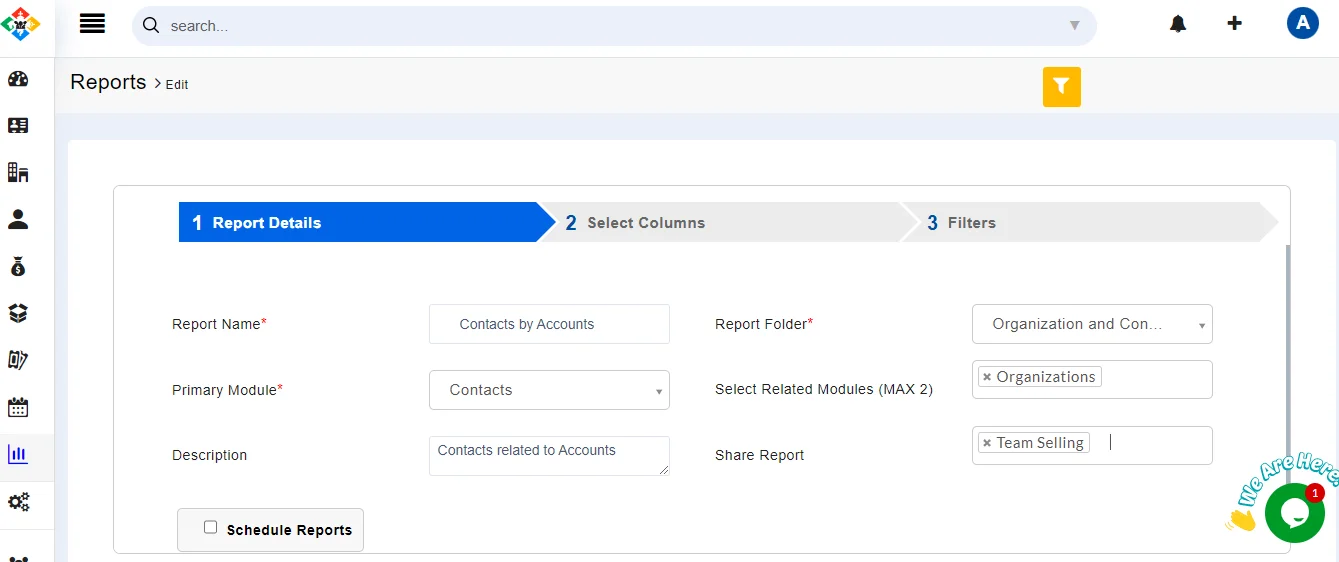
Report Details
- Add the Report Name
- Choose the folder to place your report
- Select the desired module for which you need to create a report
- Now choose the related module to the primary module chosen
- Add a description to your report
- If you need to share this report with other user, Choose the desired users from the Share Reports drop-down
- Enable the checkbox to schedule the report generation process
- Click on Next.
Select Columns
- Select columns
- Choose the column you need to include in the report
- Click on the text space and choose the fields. It displays all the primary fields and related module fields(if chosen)
- Group By
- This feature enables you to group the information based on the selected field and eliminates the scattering of information. You can group it either in Ascending or Descending order.
- Calculation
- Enable the checkboxes to perform the desired calculations
- Now click on Next
Filters
- Add the necessary filters or conditions to your reports – You can define any no. of conditions
- All Conditions (AND) – Displays record info which satisfies all the defined conditions
- Any condition is met (OR) – Displays record info which satisfies at least any one of the condition defined.
Once done, click on Save & Generate Reports. Now your report will be generated.
Chart report #
Joforce CRM lets you create reports in a pictorial format (charts). To create chart reports, click on Add Report, and choose Charts from the drop-down. Add the necessary information.
Report Details
- Add the Report Name
- Choose the folder to place your report
- Select the desired module for which you need to create a report
- Now choose the related module to the primary module chosen
- Add a description to your report
- If you need to share this report with other users, Choose the desired users from the Share Reports drop down
- Enable the checkbox to schedule the report generation process
- Click on Next.
Filters
- Add the necessary filters or conditions to your reports – You can define any no. of conditions
- All Conditions (AND) – Displays record info which satisfies all the defined conditions
- Any condition is met (OR) – Displays record info which satisfies at least any one of the condition defined.
Select Chart
- Joforce CRM renders with 4 different charts – Pie, Vertical Bar, Horizontal Bar, and Line Chart. Choose any one of the four charts.
- You can group the information by selecting the desired field from Select Group by Field drop-down
- Then select the data field
- Click on Save & Generate Report
Report Scheduling #
Joforce CRM lets you to automate the report generation to run without any intervention. To schedule your report generation,
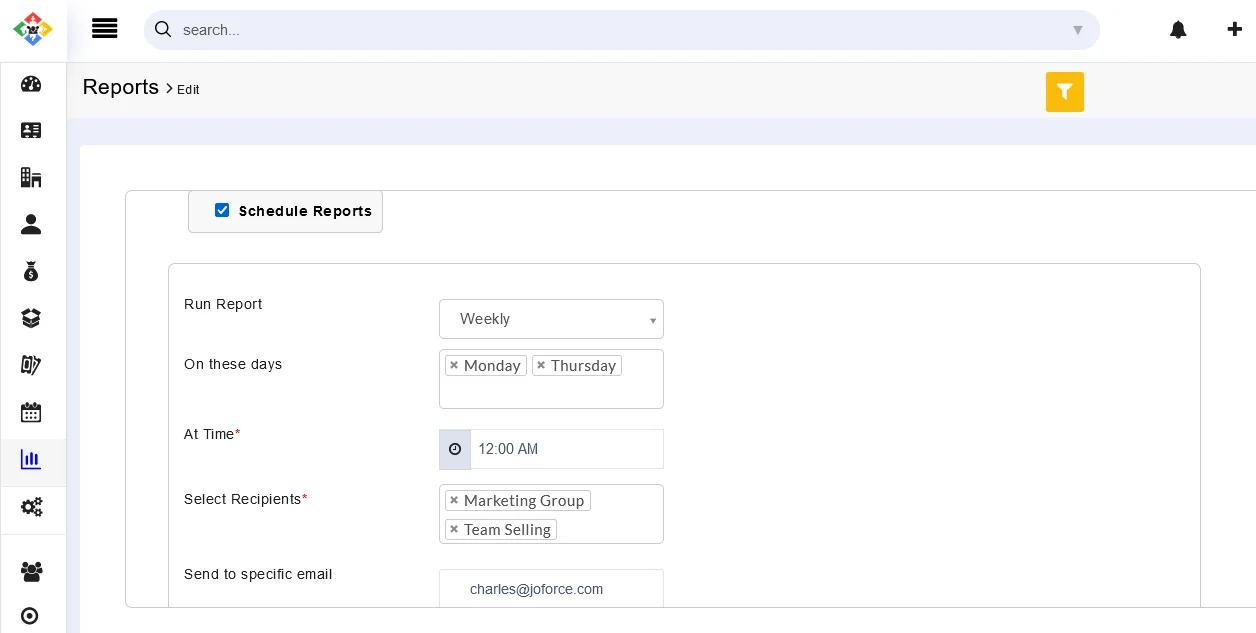
- In the first section of the report generation process, enable the Schedule Reports checkbox
- Now choose the recurrence frequency to automatically run the report and send it to the email.
- Daily – To run a report every day at the specified time
- Weekly – To run the report every week on the specified days and around the specified time
- On Specific Date – Run the report on the specified date
- Monthly By Date – Run the report on every month on the specified dates and around the specified time
- Yearly – Run the report on every year on the specified month & dates and around the specified time
- Choose the recipients(Users, Roles, Groups), to whom you want to send the report
- You can can also share the report to any specific email address
- For Detail Report, Joforce CRM offers an additional option to choose the file format, either to send the report as CSV or Excel.
Customizing reports #
Joforce CRM lets you customize the reports over and over. Navigate to the detailed view of the record.
- Click on Customize in the top left corner
- Make the necessary changes
- Finally, click on Save & Generate Reports
Pin chart report to a dashboard #
Navigate to the detail view of the record, and click on the pin icon to add the chart to the dashboard.
Export Reports #
Joforce CRM lets you export the report information. You can export the reports as a CSV or Excel file. Click on the appropriate icon in the detail view of the report to export. However, users can do this only when they have access permission.
Manage Reports #
Action performed in the list view
On the whole – Select the appropriate records → click on the drop-down menu at the top
- Move Reports – To move reports from one folder to another
- Delete – To delete a record, select record
On a single record – Click on the Horizontal ellipsis
- Edit → To edit the record
- Delete → To delete the selected record


